academics
research
publications
os x howto
links
MAC OS X LEOPARD TIPS
disclaimer
I do not assume any responsibility for any damage resulting from you trying to follow the instructions from my site. This said, I assure you that what I describe worked out fine for me. As always, YMMV. Use at your own risk, etc etc.
external links
- Installing and configuring your firewall
- Changing the default port for SSH connections
- Hosting SVN server on your Mac
- Coupling SVN with Apache authentication mechanism
(improves security, eliminates the need for any custom ports) - Configuring your Time Machine
- Configuration tips from Donald Hoard (Caltech)
ldd on Mac OS X
"ldd" in various flavors of Unix is used to check which dynamic libraries are used by the executable. There is no "ldd" command in Mac OS X (Convenient, huh?). Instead, Apple provides something that is talled "otool", which has many different options. One of them is "-L", which displays the linked libraries:sed cheat sheet
Blocking brute force SSH attacks
Recently I noticed a bunch of entries like the following in my /var/log/secure.log:
NOTE: You need to have root access for this to work.
What you need to do is the following:
- Create a directory for your script :
sudo mkdir /etc/ssh_ban
- Create the script
sudo vi /etc/ssh_ban/ssh_ban.sh
- Copy the following evil little script into the window:
#!/bin/bash SECURE_LOG=/var/log/secure.log BAN_LOG=/etc/ssh_ban/ban.log # Nov 15 09:39:59 sparrow sshd[88313]: Invalid user [user] from [host] # Nov 17 03:50:43 sparrow sshd[41813]: Failed password for root from [host] port 51567 ssh2 # Nov 12 13:52:02 sparrow sshd[16113]: error: PAM: Authentication failure for root from [host] for ip in $(egrep -o "(Invalid user [^ ]+|root) from [^ ]+" $SECURE_LOG | awk '{print $NF}' | sort | uniq ); do # If the name is the domain name, not IP, then we need to convert it to IP addr=$ip [[ $addr =~ ^([0-9]+\.){3}[0-9]+$ ]] || ip=$(host $addr | grep 'has address' | awk '{print $NF}'); grep -q $ip /etc/hosts.deny || (echo "ALL : $ip : DENY" >> /etc/hosts.deny && echo $ip $(date) >> $BAN_LOG) doneand save it (in
vi, type:wq).What is does is it scans the file /var/log/secure.log looking for the lines that contain "Invalid user *** from ***" or "root from ***", parses those lines and extracts the address of the offending host. Then it looks at the address and checks whether it is a domain name or an IP address. If it is a domain name, it retrieves its IP using the host command. Then it scans the file /etc/hosts.deny for this IP. If it is not already there, the script adds a line "ALL : [IP address] : DENY" to the file, which denies all services to this IP address.
Note that this script bans all hosts that tried EVEN ONCE to ssh to your computer with bad username or root. That iss right, even one mistake is enough. This was done because some script kiddies use host rotation, trying to break in from multiple IPs. So if you use this script, be extra careful when SSHing to your computer from outside.
Also, the script logs the banned IPs and the time when it was banned in the $BAN_LOG file. If you feel like spending some time on this, you could write a little script that checks that file from time to time and unbans the hosts that have been banned for a while (say, a week). If you have any suggestions on this, I would gladly post your solutions.
Now if you run this script as a root, the file /etc/hosts.deny be updated and the bad hosts will be blocked. But you do not want to run this script as a root every minute or so, you want to run it automatically. You can do that, and even better: you can run this script every time the file
/var/log/secure.logchanges! Heres how. - Install Lingon, "a graphical user interface for creating and editing launchd configuration files for Mac OS X Leopard 10.5." It's free and doesn't take a lot of space.
- In Lingon, create a new User Daemon and fill the form out as shown in the following figure:
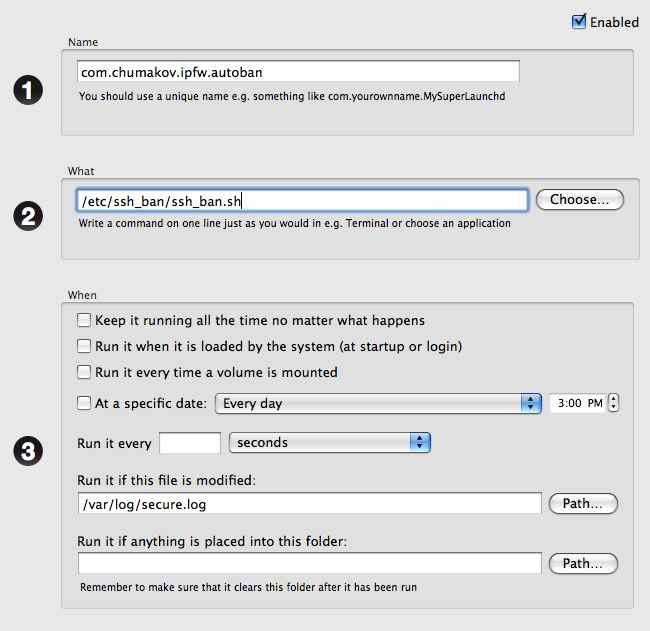
Notice the entry "Run if this file is modified". This makes sure that your script is ran every time the/var/log/secure.logis changed. - Don't forget to press "Save" button on Lingon main panel.
- Also don't forget to make your ssh_ban.sh executable (sudo chmod 755 /etc/ssh_ban/ssh_ban.sh).
- Now reboot your system.
After running this for some time, I can say that the triggering system ("Run evety time the file is modified") actually allows the hack to be performed for about 10 seconds or so. That is, the system reacts to the changes in /var/log/secure.log in about 10 seconds. But it is surely better than running the script every minute.
printing a PDF file from the command line
First line gives you the names of available printers. The second line send the PDF fileyour_file.pdfto the printerYour_printer_name.lpstat -a lp -d Your_printer_name -o sides=two-sided-long-edge your_file.pdf
sed on Mac OS X Leopard
There is only one thing I can say about sed on Leopard: it is crippled. So my advice would be: get the "Super sed"! Just go to the Seders grab bag, download the source to a temporary directory and compile it (type "make"). Then take the file "sed" from the subdirectory "sed" and move it to /usr/bin/ssed. I prefer to keep the original sed there, and name the Super sed "ssed".
Installing GD for PHP in OS X Leopard
Apple makes life inconvenient for those who wants to use the GD, an open source image manipulation library. With help of GD you are able to generate charts, graphics, thumbnails, and most anything else, on the fly. While not restricted to use on the web, the most common applications of GD involve web site development. Most usual application of GD would be a dynamic creation of thumbnails in a directory with a bunch of images. Convinently, GD comes in a standard PHP distribution (see http://us.php.net/gd ), but Apple decided not to include it in its pre-compiled version of PHP. So one is left with two choices really
- To install it from the scratch
- To get a pre-compiled version
- cd /etc/apache2
- Use your favorite text editor to open httpd.conf. I use vi:
vi httpd.conf
- Comment out the following line: "LoadModule php5_module libexec/apache2/libphp5.so". It is done by inserting a hash symbol (#) in front of the line, so it looks like this:
# LoadModule php5_module libexec/apache2/libphp5.soThis prevents Apache from loading the standard PHP library it came with.
- cd /usr/local
- sudo curl -O http://www2.entropy.ch/download/php5-5.2.5-6-beta.tar.gzThis copies the whole working PHP installation to your computer. There is no need to compile anything. Just wait patiently (in my case it took about 7 minutes).
- sudo tar -xzf php5-*-beta.tar.gzThis unpacks the archive that you downloaded into the directory /ust/local/php5.
- sudo ln -sf /usr/local/php5/entropy-php.conf /etc/apache2/other/entropy-php.confWhat you just did is add a link to the entrophy-php.conf file to the directory /etc/apache2/other. This is a directory from which Apache loads all non-standard extensions. So when you restart your Apach web server it will automatically load the new PHP version from Chimera.
- rm php5-5.2.5-6-beta.tar.gzDelete the archive that you downloaded because you no longer need it.
- sudo apachectl restartThis restarts your web server.
<?phpinfo();?>and load it in your web browser. You should see some GD options.The above snippet is taken from a comment in a blog: http://macoshelp.blogspot.com/2008/02/adding-gd-library-for-mac-os-x-leopard.html . What you really do is substituting Apple's PHP module (libexec/apache2/libphp5.so) with a precompiled PHP module from Chimera.ch forum, which contains GD. Until Apple comes up with a better solution, we're forced to use some alternatives.
AWK one-liners
Sum the column number "n" in the file
cat file | awk '{ sum+= $n }; END { print sum }'
Restart Apache webserver gracefully
sudo apachectl graceful
Last modified Aug 29 2015 02:08